Teaching Tools for members of The Church of Jesus Christ of Latter-day Saints working in Primary, Young Women's, Seminary, and Relief Society.
Showing posts with label Crafts. Show all posts
Monday, December 27, 2010
Crafts - Paper Stockings
Yes, this is another fun craft project that my mom put together this holiday season for the ladies in Relief Society. Thought they were really cute! I don't have the template, but I think you could make one pretty easily. It's a stocking made out of paper on the front and the back of a paper box. She stuffed the stocking with tissue paper and a special surprise for the ladies.
Crafts - FALL Wooden Blocks
This is slightly out of order because of some issues I've had with my computer, but I loved these wooden blocks that my Mom made for FALL. Thought you might enjoy seeing them too!
Tuesday, September 21, 2010
Beehive Messages - Check This Out!
Happy Fall! Have you ever gone to http://www.wordle.net/? If not...take some time with your children and go check it out. It's a website that creates subway art with the words you put into the master list. Way fun! I created one just to wish you all a Happy Fall. Do you see it under my link to Creative Kritters? Click on my Autumn Subway Art and away you go having some fun of your own. You can even print and frame them for your own personal use.
Side note...be careful not to use anything personal because it is published directly to the web once you are finished.
Have fun and send me links to your favorites!!!
Happy FALL!
Love,
Jennifer
Side note...be careful not to use anything personal because it is published directly to the web once you are finished.
Have fun and send me links to your favorites!!!
Happy FALL!
Love,
Jennifer
Sunday, August 22, 2010
Crafts - Color Your School Year
We are just hours away from school starting! Hip Hip Hurray!!! My little guy and I decided that it would be a good idea to do one more summer project before school starts so we came up with the idea of having something that he could give to all of his new friends at Pre-K tomorrow. We purchased over the weekend some pretzel rods and chocolate in different colors and went to town dipping the pretzels into the melted chocolate. We purchased red, orange, green, and blue chocolates so that we could wrap them later in paper that we designed to look like a CRAYON WRAPPER. You'll notice that Braden had a blast. His pretzels are the red ones and let's just say we got red EVERYWHERE, but it was totally worth it. He was having way too much fun. Once the pretzels were cooled and wrapped, we placed one of each color into a mini clear plastic bag and topped them off with a cute BACK TO SCHOOL TOPPER. Braden can't wait until the morning to share them with his new school friends.
If you would like a copy of the CRAYON WRAPPER AND TOPPER.....please comment here or email me directly at jennifer.hawkins@hotmail.com. Please be sure to leave me your email address!
Best of Luck to all of you that are preparing your children for the new school year. Stay posted for Back to School photos tomorrow!
Thursday, June 3, 2010
4th of July Handout
Okay...I realize that we are several weeks away from the 4th of July, but I thought this was a cute idea. Yes...Stacy has been busy crafting. She had the idea of cutting scrapbook paper and wrapping it around lifesavers as a fun 4th of July gift/craft/handout/etc... I think they are darling. Sure hope she sends us all one!
We love the 4th of July at our house so be sure to watch for more fun!
Thursday, April 1, 2010
Easter Crafts
My sister Stacy has been busy today. She emailed me some pictures of a couple of Easter Crafts that she made. The little basket she thought would be cute on an Easter Table as a place card holder. I personally think the candy treats inside look YUMMY! If you know me and Stacy...we both love PEEPS at Easter Time so she made a cute little peeps tag which she downloaded for free at http://eighteen25.blogspot.com/2010/02/peeps-topper.html.
What a cute idea and something quick you can make to give to friends at Easter Time.
Happy Easter!
What a cute idea and something quick you can make to give to friends at Easter Time.
Happy Easter!
Monday, March 22, 2010
Happy Birthday Subway Art
After creating the Easter Subway Art we decided that we couldn't stop there. Since we were out to celebrate a week of Birthday's we decided that we should create a Birthday Subway Art sign as well. I can't wait to display this in our home for the next family birthday.
What do you think? Should we celebrate everyone's birthday right now together?
Happy Birthday to You! Happy Birthday to You! Happy Birthday, DEAR (you fill in your name) Happy Birthday to You!
And many more!!!
Love,
Jennifer
Easter Subway Art
When the sisters get together there's no stopping the crafts and fun. This is an Easter Subway Art sign that we created while visiting each other in Arizona this month. You'll notice that PEEPS made it on the sign. Yes...my sister Stacy and I love PEEPS. Hippity Hop was a Merrilee creation and our Mom and sister Amy helped too as we sat around brainstorming words that reminded us of Easter. Merrilee was the mastermind behind the design and we have Stacy to thank for the idea.
We're dying to know what you think. What are some of your favorite SPRING/EASTER words?
Happy Easter!
Jennifer
Friday, March 19, 2010
Jar of Thanks!
While in Arizona last week...the sister's got in BIG trouble out shopping with our mom. As we shopped we saw an idea that sparked the creation above. My sister, Stacy, ran home and made this cute JAR OF THANKS.
Here's what you do...
Find a small glass jar with a lid. The Mason Jars would work perfectly! Then...go to your local dollar store and find some coasters. You'll need a fun treat to go inside the jar. I think she used Easter M&M's...one of my favorites!!! Find some cute scrapbook paper and cover the top of the coaster. Glue the jar on top of the coaster. Fill the jar with your favorite goodie. When you go to put the lid on be sure to add some ribbon that goes underneath the lid or under the jar and around to the top so that when you close the lid you still have ribbon to use to tie on a note of thanks, etc... Pass your jar on to a friend, neighbor, family member or use it as a gift. I know I would love to receive something as cute as this.
Another fun thing to add to the card or to the top of the jar would be a paper or fabric flower...just an idea!
Elbow Macaroni Lamb
This is a little lamb that my son Braden and I made. I thought it turned out pretty cute and could be used as a Primary Activity or Young Women's Activity depending on what you are teaching. Maybe a lesson on Feed My Sheep or Come Unto Christ? It was simple enough that he could make it.
What you'll need:
* One Large Wooden Circle - body
* One Smaller Wooden Circle - face
* 2 large spring type clothespins
* Elbow macaroni - painted white (we did this by dumping the macaroni into a bowl with some white paint and stir it with a spoon)
* Black Felt - ears
* 2 Movable Eyes
* Black and White Paint
* Red Ribbon - mouth
Paint the large wooden circle white.
Paint the smaller circle black. Let Dry!
Paint the 2 clothespins black.
Paint the macaroni white.
Cut out two ears out of the black felt.
Once the paint has dried...glue the smaller circle to the larger circle. Glue the macaroni onto the top of the lamb's head and the body of the lamb. Cut small pieces of red ribbon and glue on for a mouth. Glue on the ears and attach the clothespins to the bottom as the legs. Make sure you add the wiggle eyes! The lamb will be able to stand up freely.
Happy Spring!
Friday, February 12, 2010
Fun Valentine Idea
Monday, September 7, 2009
Dandelion Centerpieces
Another fun FLOWER idea from Stacy Bomhoff...
Supplies:
4 to 6 inch clay pot
Styrofoam Ball (sized so it can be cut in 1/2 to fit snug in pot to hold flowers)
Bamboo Skewers about 12 per pot (use your judgement)
Butterscotch Candy Disks (NOTE: get twisty-closed kind, they look best)
Green Florists Tape
Decorative Ribbon or Gem-Like Stuff to Decorate Pot
Mossy Floral Moss
Let's go! First, take your styrofoam ball, cut in 1/2 and wedge (sphere-side down) into pot snuggly so flowers stay up. Then, glue, tie and decorate. Place decorative ribbon around the pot. Now, using your creative side, take a skewer, some candies, and floral tape and begin taping on candies. Start with one candy at top, working from the side that is not POINTY. Work down by wrapping and wrapping and randomly placing candies along the skewer. Typically 3 to 5 is what you need. Stab that skewer into your pot, and do another. Etc... Using your artistic eye, judge the size of each skewer needed, and the amount of candies on each. We used this piece to celebrate "Pioneer Day" as a table center piece, but also makes an excellent gift. Worther's Originals can work, but the label may cause distraction. However...if this gift is going to someone who loves Worther's...go for it!!!
Have lots of fun!!!
Foam Gift Flowers
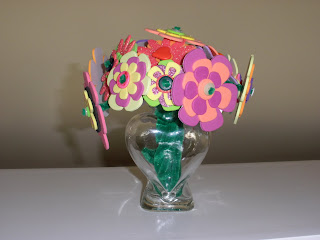
This is a fun idea shared by Stacy Bomhoff. Instead of your typical "flower gift" try making these. Her sister often uses these when...
1. The kids need to make a gift.
2. A person is in ICU where regular flowers, balloons, monkeys, and other traditional cheer me ups are forbidden for the patient's safety.
Most of you probably have this kind of stuff laying around your home.
Supplies:
1. Small Jar (ideally narrow neck, but doesn't matter) These do not need to be expensive.
2. Foam Flowers, Shapes, etc... (you can cut out flowers too)
3. Buttons
4. Green Pipe Cleaner
5. A Narrow Screwdriver or Pointed Object
To make your bouquet...get creative using your pre-cut flowers layering up 3 or 4. Once you are satisfied stick them together. Most will already have sticky stuff on the back. Center a button in the middle. Poke, with your screwdriver, thru the foam flowers and thru 2 button holes. You can also make 2 holes if using a real fancy button. Sometimes it helps to remove the button after initial poke so you can really stab thru the foam. Then, using the green pipe cleaner go to the top of the flower and thread one end into one button and flower hole. Thread the other end thru the other button and flower hole. Pull pipe cleaner thru tightly and VIOLA! A pretty flower! Adjust the size by adjusting the amount of pipe cleaner pulled through on each side. Make a bunch and share!!!
This is a great project for children because they can practically make it all on their own!
Monday, August 10, 2009
Fun Craft Idea - Tooth Fairy Bags
Subscribe to:
Posts (Atom)