


Can you smell the cookies? You can?
For the past few years we have had a tradition in our ward of having a Cookie Exchange hosted by my dear friend Isabel. This year...Isabel ran off prior to our scheduled party to be with her daughter who is expecting any day now. We sure missed her! The Cookie Exchange is the highlight of the holiday season for all of us girls. Each of us brings 4 to 6 dozen cookies which we proudly display on a table that is set up each year by one of the sisters. Then, we have a yummy dinner, play games, and proudly share with the others the story behind our cookies. A few years ago, three of us decided that we needed to be in all of the cookie photos. The first year we just jumped in. The second year we snuck around and popped in without the ladies seeing us and this year we decided that we should judge the cookies. I'm sharing with all of you just a few of my FAVORITE photos from this year. As you can see...we got a little silly!!! Sure was fun!!!
I'm also going to share the cookie recipes with all of you for the cookies I made. I got both of these recipes from the Land O Lakes 2009 Cookie Magazine. They were delicious. You must try them!!! Enjoy and happy cookie baking!!!
CANDY CANE BISCOTTIThe lively aroma of sweet peppermint will drift from your oven as you bake these small and tender biscotti cookies.
Preparation time: 45 min Baking time: 30 min
Yield: 4 dozen cookies
Cookie Ingredients:
1/2 cup LAND O LAKES® Butter, softened
1/2 cup sugar
3 LAND O LAKES® All-Natural Eggs
2 1/2 cups all-purpose flour
1 1/2 teaspoons baking powder
2/3 cup finely crushed peppermint candy canes*
Coating Ingredients:
1 (14-ounce) package (almond bark) vanilla candy coating
2 drops red or pink food color
1/4 teaspoon peppermint extract, if desired
Decorator candies, sugars or crushed peppermint candy canes, if desired
Heat oven to 350°F. Combine butter and sugar in large bowl. Beat at medium speed, scraping bowl often, until creamy. Add eggs; continue beating until well mixed. Reduce speed to low. Add flour and baking powder; continue beating until well mixed. Stir in crushed candy.
Divide dough into fourths on lightly floured surface with lightly floured hands. Shape each into 9x1 1/2-inch logs. Place logs 3 inches apart onto lightly greased large cookie sheet.
Bake for 18 to 20 minutes or until tops are cracked and ends just start to turn light brown. Remove from oven; reduce oven temperature to 325°F. Cool logs 10 minutes on cookie sheet.
Carefully remove logs to cutting surface. Cut into 1/2-inch slices with sharp serrated knife. (Discard ends). Arrange pieces on same cookie sheet, cut-side down. Continue baking for 12 to 14 minutes, turning once, or until cookies are lightly browned and crisp on both sides. Remove to wire cooling rack; cool completely.
Place candy coating in 2-quart saucepan. Cook over medium heat, stirring occasionally, until melted (5 to 7 minutes). Remove from heat. Stir in food color and peppermint extract, if desired.
Dip each biscotti half way into warm coating; shake off excess. Place onto waxed paper. Immediately sprinkle with decorator candies, sugars or crushed candy canes, if desired. Let set at room temperature until coating is hardened (about 1 hour).
*Substitute 30 starlight mint hard candies, crushed.
Recipe Tip
To crush candy canes, place candy in heavy-duty resealable plastic food bag. Seal bag; pound candies with rolling pin or hammer to crush. (If bag starts to puncture, place bag in another bag and continue pounding.)
Recipe Tip
Line cookie sheet with parchment paper for easy cleanup and to prevent candy in dough from sticking to cookie sheets.
Recipe Tip
Leftover candy coating can be used to dip pretzels.
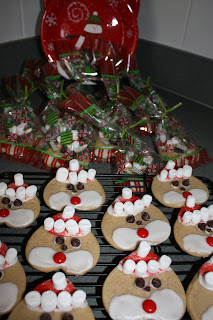
SANTA SUGAR COOKIESUse a heart-shaped cookie cutter and decorate the cookies upside-down to create these cute Santa faces.
Preparation time: 1 hrs Baking time: 7 min
Yield: 3 dozen cookies
Cookie Ingredients:
1 cup LAND O LAKES® Butter, softened
1/2 cup firmly packed brown sugar
1/4 cup sugar
2 cups all-purpose flour
Glaze Ingredients:
2 1/2 cups powdered sugar
2 to 3 tablespoons water
1 tablespoon LAND O LAKES® Butter, softened
1 tablespoon light corn syrup
Decorations Ingredients:
Sliced miniature marshmallows
Red decorator sugar
Coconut
Mini chocolate chips and/or mini candy-coated chocolate pieces
Combine all cookie ingredients except flour in large bowl. Beat at medium speed, scraping bowl often, until creamy. Reduce speed to low; add flour. Beat until well mixed.
Divide dough in half. Shape each half into a ball; flatten slightly. Wrap each in plastic food wrap; refrigerate until firm (at least 30 minutes or overnight).
Heat oven to 350°F. Roll out dough on lightly floured surface, one-half at a time (keeping remaining dough refrigerated), to 1/8-inch thickness. Cut with 3-inch heart-shaped cookie cutter. Place 1 inch apart onto ungreased cookie sheets. Bake for 7 to 9 minutes or until edges are very lightly browned. Cool 1 minute on cookie sheet; remove to wire cooling rack. Cool completely.
Combine powdered sugar, 2 tablespoons water, 1 tablespoon butter and corn syrup in small bowl. Beat at low speed until powdered sugar is moistened. Increase speed to medium; beat until smooth, adding additional water, if necessary, for desired spreading consistency.
Working with 1 cookie at a time, frost pointed part of cookie to make Santa’s hat. Place cut marshmallows onto frosting for hat trim; sprinkle hat with red sugar.
Frost curved portions of cookie. Sprinkle with coconut; press down lightly to make Santa’s beard. Use glaze to attach chocolate chips and/or chocolate pieces for eyes and nose.
Recipe Tip
If dough is too cold and cracking when rolling, let soften at room temperature a few minutes before rolling.
Recipe Tip
For ease of decorating, place decoration ingredients into individual bowls.


